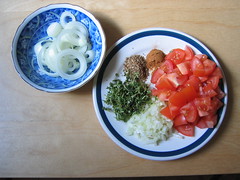
Thursday, February 28, 2013

book review: Animal, Vegitable Miracle


By: Barbara Kingsolver

I have just finished reading a wonderful book. It was a gift from my wife’s aunt and a wonderful gift it was. It is “Animal, Vegetable, Miracle” by Barbara Kingsolver. It is not a cookbook but definitely a foodie book. Barbara is an award winning poet and story teller with amazing writing skills.

In this book Barbara takes along on her and her families’ quest to live one year on only what they can grow or buy locally. They move from Phoenix Arizona to the lower Appalachians, where her husband still owns a farm, and start their new life off the Food Industry chain. No California fruits or vegetables in winter, no Mexican melons, only the food grown on their own farm or the farms of their neighbors.

Along with the tale of their trials and triumphs, Barbara gives us an education in the American Food Industry. From the development of GM plants and elimination of heirloom species to transportation cost and effects on American Food Culture she takes us to school. Full of links of where to find almost anything whole food related, this book is an invaluable resource to have.

If you enjoy an entertaining story full of lively characters and don’t mind learning something along the way, you will fall in love with this book.

Wednesday, February 27, 2013

Coconut to Coconut Milk to Coconut Oil


Coconut to Coconut Milk to Coconut Oil
Mature Coconuts


splitting the coconut
People, who really know me, know that I have become a bit of a fanatic about eating fresh and local. The reasons for this are many and diverse, from health to environment the benefits of eating fresh and local out way the added effort required. With this in mind, I decided to walk you through what to me is an amazing process that can free you from buying processed Coconut Milk and or Coconut oil. As an added bonus this is a zero waste process and I’ll show you how every part of the Coconut is used. Discard nothing just set to the side as we finish each step.


Ate Merly sitting on a Kudkura
Tradional stol for scraping
Coconut
For most people Coconut Milk is something that comes from a can. Let’s be honest most people have no idea what it actually is. I hate to admit it but at one time many years ago I thought it was the juice of the coconut. I was wrong and since I know better now I would never go back to using the stuff in cans there is no comparison between fresh and canned for taste and healthfulness.

Coconut Oil if you not familiar with it, has gotten a bad rap the last few years. Yes it is high in saturated fat but this particular type of saturated fat is actually good for your heart. I won’t go into the biochemistry here but the body is wonderful at using natural products. Coconut oil is also a natural antiviral compound internally and externally. It can be used as a natural skin lotion and hair conditioner.  Besides all this, it is wonderful to cook with.

Coconut Oil has a high melting point so don’t be surprised if when cooled you have shortening instead of oil. It also is highly resistant to scorching and adds a wonderful slightly sweet taste to everything cooked in it.

Let’s get started; first what you’re going to need for this project:


Finished Coconut Milk

 
2 Coconuts mature

2 cups water

 Large Sauce pan or Wok

Sharp knife


Coconut milk starting to boil
Spoon


Strainer

Container for finished oil and/or milk


Scraping the sides is very important
Push all soilds to the center
Start by cracking your coconuts; lay them in your hand over a large bowl with the eyes facing your arm. Strike the coconut with a sharp knife at its equator as you slowly rotate it in your hand. It may seem strong but the shell will crack like a nut. When it does crack the Coconut Juice will flow out, this is why you have the bowl. Don’t waste this juice it is wonderfully refreshing drink and is also useful in many recipes.


Solid curds (Latik) forming
After you have split your coconuts into halves scrap out the meat. This can be done with a good spoon or with a knife. Grate the Coconut meat into a bowl and add your water. Work your meat and water together. You can’t over work it so use some strength and work them well. You will notice that you are gaining liquid as you do this. Work for 4-5 minutes and then strain. Guess what you now have fresh Coconut milk.

Latik starting to fry
Latik ready to be drained
You can stop here if all you wanted was the milk but the story goes on.  Next we will make Coconut oil from the milk. Pour your fresh Coconut Milk into a large pan (a wok works best) and place it over a high heat until it starts to boil then reduce your heat to medium. Continue boiling constantly working the sides into the middle of the pan. You will begin to see rubbery curds starting to form, when you see these lower your heat to low medium and continue to stir from the sides to the middle. These solids are known as Latik, they will continue to harden and start to fry as the oil separates’. Continue cooking until the Latik is a golden brown and then remove them from your pan and remove your pan from the heat. The oil in the pan is 100% pure and natural Coconut Oil. Here is how we reach zero loss.

·        The Coconut Shells can be used for grilling or smoking.  They have a nutty flavor that is very nice.

·        The Coconut Juice I chill and drink or save for making cocktails.

·        The waste meat is a wonderful natural fertilizer or can be added to your pets’ food. They will love the sweet taste.

·        The Latik is used as a desert topping or sprinkled with sugar and eaten as a sweet snack. Try it; you’ll be surprised how delicious it is.

·        The Coconut Oil is of course our main finished product. Use it to cook make salad dressing, whatever your heart desires.
Finished Coconut Oil and Latik

This process beginning to end takes about one hour. I was blessed when I started writing this article to have someone volunteer to show me the traditional methods of making Coconut Oil and Latik. My thanks to Ate Merly the photographs that accompany this post are all of her work.


Enhanced by Zemanta

Tuesday, February 26, 2013

Ten Secrets of A Happy Marriage


Ten Secrets of A Happy Marriage

I know list like this are old hat but for once I will give you a list and explain how it really applies. This list is actually coauthored by my wife, like most things in our life we did it together.


1)    Make your spouse happy before yourself. If your partners happiness is your first priority and yours theirs, you will find very little to get upset about. Like most things in life you get what you give.

2)    Acknowledge and respect your spouse’s strengths and your own weaknesses. No two people think alike or are good at the same things. There are things my wife is better at than I am. I have learned to yield to her strengths and her to mine. Whatever the task follow the judgment of the person whose strength lends itself to the situation.
Marriage
Marriage (Photo credit: Lel4nd)


3)    Always be open and honest; never hide your true feelings. At times my wife upsets me; at times I upset her. We always discuss a problem when it happens. If your spouse hurts or upsets you and you don’t share it. It is YOUR FAULT, NOT THEIRS when it happens again. People don’t know if they are not told.

4)    Appreciate the little things, don’t take them for granted. Life is made up of little things. Most of us tend to forget this. My wife lays my clothes out for me. She always carries an extra towel, for me, when we go out. I make sure she has extra money in her pocket and checks the load on her phones. I make her coffee in the mornings. Little things but things done out of love.


5)    Be friends first. I am always amazed at how many of us treat our friends better than we do our spouse. If you or your spouse is upset each other’s shoulders should be the first you reach for. If you are happy they should be the first you share the good news with and if it’s a choice of who to spend time with, there is no choice. See number 1 for how this applies.


Marriage Day
Marriage Day (Photo credit: Fikra)
6)    Always say you love each other. We all want to hear it. The night my father was killed he started to leave the house but came back inside just to tell me he loved me. He was killed later that night. I have never forgotten his last words to me. None of us knows what will happen when.

7)    Support each other. In sickness and health; in poverty and wealth and beyond this. Support each other’s dreams. If you can’t believe in the dream, believe in the dreamer. Help each other succeed.

8)    Remember an open heart is more valuable than an open mouth. Most of the time we want someone to listen and share our troubles not solve our problems for us. Unless you here “what should I do” open your heart not your mouth.

9)    Forgive and forget DON’T forgive and bring back. A wound that is picked at will never heal. Don’t be guilty of robing the future by living in the past.

10)                       Remember the bed is for more than sleeping and the kitchen table works well too. Be honest, most of us feel in lust before we feel in love. Don’t let the fire die. Always let your spouse know you still find them desirable and exciting, find new places and positions. If you are normally dominate try being submissive or vice versa. Always remember number 1 on this list.

There you have my ten secrets for a happy marriage. Yours may be the same or maybe different but these work well for my wife and me. If you can’t remember them all just remember number 1 on the list. It is the foundation for all the rest. If you always put your spouse first you will never finish second.


Enhanced by Zemanta

Gift from a friend


Here are a couple of shots of a pineapple a neighbor brought me from his yard. It weighed a little over 2 kilo or almost 5 pounds and tasted Oh so sweet.


Monday, February 25, 2013

Creamy Blue Cheese Dressing Recipe


Creamy Blue Cheese Dressing
blue cheese Français : Bleu

I am a big fan of cheese in all its different forms and Blue Cheese is one of my favorites. With a history going back to at least 79 AD Blue Cheese comes in several forms depending on its place of origin and the type of milk curd it is made from. The one thing all Blue Cheeses have in common is the distinctive bluish veins that run through them. This is caused by the presence of saprotrophic fungus Penicillium roqueforti, the same mold that gave us Penicillin.

Here is my recipe for a Creamy Blue Cheese Dressing. There are actually two different versions of this recipe with the only difference being one is made with Yogurt and the other with Sour Cream. Use whichever gives you the flavor profile that you are looking for.

½ cup Mayonnaise

½ cup Plain Yogurt or 2 Tbs Sour Cream

 1 Tbs Chives

1Tbs Parsley


2 Tbs Blue Cheese (type of your choice) softened

In a bowl place the Blue Cheese and Lemon Juice mash and mix with a fork until you have a paste. Slowly whisk in Mayonnaise until cheese paste is well incorporated then add your Chives and Parsley and lastly mix your Yogurt or Sour Cream in. Chill and Enjoy!
Enhanced by Zemanta

Sunday, February 24, 2013

Basic Salad Dressings 2


Tangy salad dressing
Tangy salad dressing (Photo credit: Wikipedia)

Welcome back everyone today is week two of “Basic but WOW Sunday” and I hope to finish today, talking about basic salad dressings. First thing, I would like to thank my friend and fellow blogger Graham Pearson of Entropy Kitchen for suggesting this topic. I hope between last week and this week I have done it justice.

Last week I talked about basic Vinaigrettes and Emulsified Vinaigrettes. Today I will take you through some of the basics of Creamy Dressings. This is a very broad subject so I will stick to the very basics here while still providing some of my favorite recipes in accompanying post.


Creamy Salad Dressings can be made from many bases, the most popular being Mayonnaise, Sour Cream and Yogurt but can actually be made from anything that gives you a creamy texture. One of my favorites is my own “Garlic Ginger Dressing” which is based on Peanut butter. May sound odd but in cooking there is no right or wrong only good tasting and not so good. If you think it sounds good, try it. Don’t be afraid to experiment and dressings are a good place to start playing with different seasonings. Be the chef experiment and have fun.

The closeup of a salad. Ingredients include le...The key to any salad dressing is the flavors should never be too strong, the object is to enhance the flavors of your main ingredients not hide them. A good dressing brings out, blends and highlights the wonderful flavors of the main ingredients without covering them up. To accomplish this seasoning should be subtle not overpowering. They should complement not kill.

The best way to learn is by doing so let’s start by making a Basic Mayonnaise. Click the link in the text for the recipe. Then see what we can accomplish from this basic start.

From this Basic Mayo you can make a Blue cheese dressing a Garlic dressing or combine it with Sour Cream or Yogurt to make any number of other dressings. I’ll be posting recipes all week to help you along with this. For now just keep it simple try taking ½ cup of you Basic Mayo add 1 minced clove of garlic, 1 tsp of grated Parmesan Cheese and 2 Tbs of Sour Cream. Slowly mix in about 2 Tbs of Olive Oil; you have just made a very nice Garlic Parmesan Salad Dressing.


Thousand Island Dressing on a plate of salad. ...
Thousand Island Dressing on a plate of salad. Taken by Flickr user JND90745 at Pancho's restaurant, Manhattan Beach, California, USA. (Photo credit: Wikipedia)
Yes it is that simple. It is that easy and as I keep saying there are no limits except the ones you put on your imagination. I hope I have done a sufficient job of introducing you to the basics of Salad Dressings. I hope I have inspired you to try going your own way following your own heart in the kitchen.

 Sunday is the day that I hand my blog over to you. You pick the topic. If you have any questions please comment below. If you have any Ideas or suggestions for future subjects in the basics category, please let me know. I’ll leave you today with this, No matter your endeavors always, Enjoy!


Enhanced by Zemanta

Basic Mayonnaise Recipe


Basic Mayonnaise Recipe

Rouille sauce
Mayonnaise is a very basic condiment it can be used as a Sandwich Spread, Salad dressing alone or as a base for more ambitious recipes. Here is the Mayo reduced to its most basic elements. To be honest it is very rare for me to stop with this recipe. For me pushing the limits and trying new flavors is a passion. Do yourself a favor and add to this recipe. Make a Garlic Mayonnaise; make a Chili Mayo, experiment and have fun. Come up with something new and share it here. I love to see and spread my readers’ ideas. You’ll need:

1 Egg Large

1½ tsp White Wine Vinegar

1 cup Oil (olive oil, coconut oil your favorite)

2 Tbs Lemon

¼ tsp Dry Mustard (optional)

Whisk and Mixing Bowl

Or

Mixer/Food Processor

In a bowl combine Egg, Vinegar and half your Lemon juice whisk together until frothy and light. Whisking continuously slowly add your Oil in a steady stream being careful not to add to fast or you will kill your froth. Still whisking add remaining Lemon juice and Dry Mustard, mix well. Place in a jar that seals well or in a bowl covered with plastic wrap and refrigerate. All this can be done in a mixer or food processor. This mayo will keep for about a week as long as it is kept chilled.
Enhanced by Zemanta

Friday, February 22, 2013

Malunggay, Miracle Tree


Malunggay, Miracle Tree


English: Sonjna Moringa oleifera in Kolkata, W...
Part 1


Today I want to start telling you about one of my new favorite ingredients, Malunggay. This may take more than just one post as this is a wonder of nature. I admit I was slow to try it. I will normally try anything but for some reason I just didn’t get around to Malunggay even though I saw it every day. When I did try it, I hated that I waited so long and then when I researched it, I wish I had been eating it every day.


Moringa Oleifera
Moringa Oleifera (Photo credit: ValMan)
The Malunggay tree is known by many names moringa , horseradish tree, benzolive tree, kelor, marango, mlonge, moonga, nébéday, saijhan, sajna or Ben oil tree, drumstick tree and many others. It was originally a native of the Himalayan foot hills but has spread throughout Asia and many other regions of the world. It is a hardy plan that will tolerate a wide temperature range; it is drought resistant and tolerates poor soil very well. Because of these traits and others that will become apparent. Malunggay is seen as one possible solution to famine relief in many areas.


Moringa oleifera
Moringa oleifera (Photo credit: tonrulkens)
There is no part of the moringa tree that cannot be utilized for food in some way. The roots have a pulpy core with a taste reminiscent of Horseradish. The British soon discovered this after coming to India and used it in sauces for their meals. The bark can be used as a seasoning and gives a warm almost peppery flavor. The young Bean bods or drum sticks as the Brits called them are normally parboiled while the mature bods are shelled and the beans eaten like peas or roasted and eaten like nuts. These are very tasty. The bean is also a good source of oil yielding up to 40% of their wait. This oil known as Ben oil is highly resistant to rancidity and even shows promise as a biofuel. The leaves are my favorite part. They have a lite green taste and can be incorporated into almost type of food. Here in the Philippines they are used as a true green boiled or added to soups, or my favorite way, ground and added to the dough for Pandesal, a Filipino type of sweet bread.
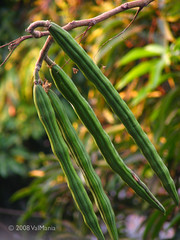
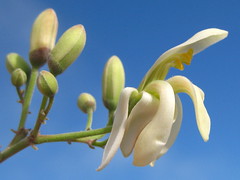

This is just a basic introduction to a wonderful plant. I hope to make you more familiar with. I have not even touched on the wonderful nutrition or health benefit facts this plant can bring to our tables. Those subjects will have to wait until my next installment on this subject. You’ll understand why it is being called “The Miracle Tree”. Look for it next Friday. Same Bat Time, Same Bat Channel. Enjoy!


Enhanced by Zemanta

Thursday, February 21, 2013

Filipino Halayang Ube ( Jellied Purple Yam) Recipe

Filipino Halayang Ube ( Jellied Purple Yam)
English: Ube halaya (ube jam) made from mashed...
English: Ube halaya (ube jam) made from mashed ube (purple yam Dioscorea alata) with condensed milk (condensada). This dish is a commonly served in festive occasions in Philippine cuisine. (Photo credit: Wikipedia)

The Ube or Purple Yam is a native of Asia but is now found throughout the world. It has many names including Hawaiian Yam, Winged Yam, Water Yam and Ten month Yam. It grows well in almost any Subtropical to Tropical Region. It contains no fat, no saturated fat, very little sodium and is an excellent source of natural fiber.  Ube lends itself to sweet application and flavor profiles. Here in Asia, it is used in cakes, cookies, ice-creams, Halo Halo and in the desert I present here, Halayang Ube or Jellied Purple Yam.

2 lbs. Ube (Purple Yam) unpeeled


¾ cup Butter softened

1 1/3 cup Sugar

Pinch of Salt

½ cup Cheddar Cheese grated

1Tbs butter for greasing


Purple yam
Purple yam (Photo credit: Wikipedia)
Boil your Ube in water with a pinch of salt for approximately ½ hour, checking doneness with a toothpick or cake tester. Make sure they are soft all the way through. Remove from water and carefully remove the skins and place in a large bowl still warm. Next, using a Potato masher or mixer on low mash your Ube until there are no lumps visible. Stirring constantly add you butter and work it in. Then your Coconut Milk, Heavy Cream and lastly your sugar. Continue mixing until smooth. You may need to add a little extra Cream; it should be a thick pudding consistency. Grease your pan or bowls if doing individual servings with butter and spread evenly; Place in refrigerator and allow to become well chilled. Sprinkle shredded Cheddar over the top and serve. Enjoy!

Remember to send me your ideas for “Basic but Wow Sundays” and you can now follow this blog at www.facebook.com/EatinModerblog and on Twitter at @glovvornblog
Enhanced by Zemanta

Wednesday, February 20, 2013


Go To Ingredient?


Ingredients
I’ve noticed that most chefs have a go to ingredient, for some it is a certain seasoning or spice for others it is certain dairy products. Regardless of where it comes from or what it is we all seem to have a favorite item that acts like a security blanket for us.


I want to know what yours is, what is it you reach for when you’re not sure what to reach for? Let me know here.

Please comment with your favorite ingredient and/or as always your ideas for my basic Sunday blog.

Enhanced by Zemanta